Decoding the Shower Mixing Valve Diagram: A Comprehensive Guide
Understanding a shower mixing valve diagram is crucial for anyone undertaking plumbing repairs, renovations, or even new installations. These diagrams provide a visual representation of the internal workings of a shower mixing valve, helping to identify components, troubleshoot problems, and ensure proper functionality. In this comprehensive guide, we will delve into the intricacies of shower mixing valve diagrams, exploring different types, key components, troubleshooting tips, and best practices for installation and maintenance.
What is a Shower Mixing Valve?
A shower mixing valve, also known as a thermostatic mixing valve (TMV) or pressure-balancing valve, is a plumbing device that blends hot and cold water to deliver a constant, safe water temperature to the showerhead. This prevents scalding or sudden temperature fluctuations, enhancing user comfort and safety. The valve maintains the set temperature regardless of changes in water pressure or temperature in the supply lines. A shower mixing valve diagram illustrates the internal mechanisms that achieve this balance.
Types of Shower Mixing Valves
Several types of shower mixing valves exist, each with its own design and functionality. Understanding these differences is essential for interpreting the corresponding shower mixing valve diagram.
Pressure-Balancing Valves
Pressure-balancing valves adjust the hot and cold water supply based on pressure changes. If the cold water pressure drops, the valve reduces the hot water flow proportionally, maintaining a consistent temperature. These valves are simpler in design and generally more affordable. The shower mixing valve diagram for this type typically shows a spool or piston that moves in response to pressure variations.
Thermostatic Mixing Valves (TMVs)
Thermostatic mixing valves (TMVs) are more sophisticated, using a temperature-sensitive element (often a wax element or a bimetallic strip) to control the mixing of hot and cold water. TMVs provide a more precise and stable temperature control, making them ideal for households with children or elderly individuals. A shower mixing valve diagram for a TMV will usually include the thermostatic element and its connection to the valve’s internal components.
Diverter Valves
While not strictly mixing valves, diverter valves are often integrated into shower systems to switch water flow between different outlets, such as a showerhead, a handheld shower, or a tub spout. A shower mixing valve diagram in this context shows how the diverter mechanism redirects water flow.
Key Components of a Shower Mixing Valve Diagram
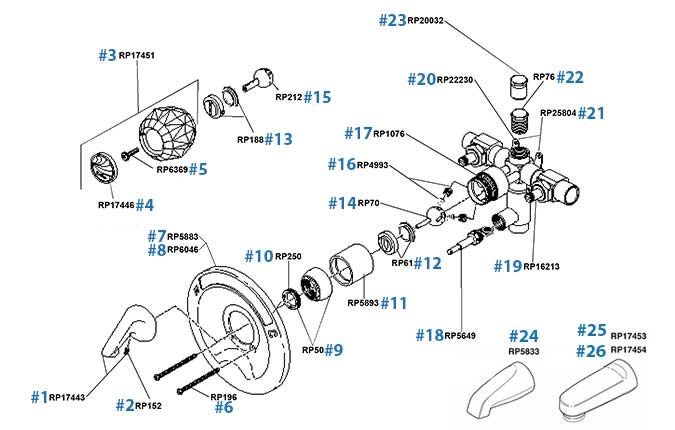
A typical shower mixing valve diagram will illustrate several key components, each playing a vital role in the valve’s operation:
- Valve Body: The main housing of the valve, containing all the internal components.
- Hot and Cold Water Inlets: The points where hot and cold water supply lines connect to the valve.
- Mixing Chamber: The space within the valve where hot and cold water are blended.
- Temperature Adjustment Handle: The control used to set the desired water temperature.
- Spool or Piston: The component that moves within the valve to regulate the flow of hot and cold water (primarily in pressure-balancing valves).
- Thermostatic Element: The temperature-sensitive component that controls the mixing of hot and cold water (primarily in TMVs).
- Check Valves: These prevent backflow of water from the hot to cold or cold to hot supply lines.
- Outlet: The point where the mixed water exits the valve and flows to the showerhead.
- Cartridge: Many modern valves use a cartridge containing most of the moving parts, making replacement easier.
Interpreting a Shower Mixing Valve Diagram
To effectively use a shower mixing valve diagram, follow these steps:
- Identify the Valve Type: Determine whether the diagram represents a pressure-balancing valve, a thermostatic mixing valve, or another type.
- Locate the Inlets and Outlets: Identify the hot and cold water inlets and the outlet to the showerhead.
- Trace the Water Flow: Follow the path of the water from the inlets, through the mixing chamber, and out to the showerhead.
- Identify Key Components: Locate the spool, piston, thermostatic element, check valves, and other critical parts.
- Understand the Adjustment Mechanism: See how the temperature adjustment handle controls the internal components to regulate water temperature.
Troubleshooting Common Issues Using a Shower Mixing Valve Diagram
A shower mixing valve diagram can be invaluable for diagnosing and resolving common shower problems:
No Hot Water or Insufficient Hot Water
Check the hot water supply line and ensure it is properly connected. Refer to the diagram to see if the hot water inlet is blocked or if the check valve is malfunctioning. A faulty thermostatic element in a TMV can also cause this issue.
Water Temperature Fluctuations
Fluctuations can be caused by pressure imbalances in the hot and cold water supply lines. Inspect the spool or piston in a pressure-balancing valve for wear or damage. In TMVs, a malfunctioning thermostatic element or mineral buildup can be the culprit. The shower mixing valve diagram will help you locate these components.
Leaking Valve
Leaks can occur due to worn-out O-rings, seals, or a cracked valve body. Refer to the diagram to identify the location of seals and O-rings. Disassemble the valve carefully, following the diagram as a guide, and replace any damaged parts. [See also: How to Repair a Leaky Shower Faucet]
Stiff or Difficult Temperature Adjustment
Mineral buildup or corrosion can cause the temperature adjustment handle to become stiff. Disassembling the valve and cleaning the internal components can often resolve this issue. The shower mixing valve diagram will show how to access and clean these parts.
Installation and Maintenance Best Practices
Proper installation and regular maintenance are crucial for the longevity and performance of a shower mixing valve. Always consult the manufacturer’s instructions and local plumbing codes.
Installation
- Turn Off Water Supply: Before starting any work, turn off the water supply to the shower.
- Follow the Diagram: Use the shower mixing valve diagram to understand the valve’s internal workings and connections.
- Proper Connections: Ensure all connections are tight and leak-free. Use Teflon tape or pipe dope on threaded connections.
- Check Valve Orientation: Ensure check valves are installed in the correct orientation to prevent backflow.
- Test the Valve: After installation, test the valve for proper temperature control and leaks.
Maintenance
- Regular Cleaning: Periodically clean the valve to remove mineral buildup.
- Inspect for Leaks: Check for leaks around the valve body and connections.
- Replace Worn Parts: Replace worn-out O-rings, seals, and cartridges as needed.
- Flush the Valve: Flush the valve to remove any debris or sediment.
Choosing the Right Shower Mixing Valve
Selecting the right shower mixing valve depends on several factors, including budget, desired features, and plumbing system compatibility.
- Consider Your Needs: Determine whether you need a pressure-balancing valve or a thermostatic mixing valve. TMVs offer more precise temperature control and are ideal for households with children or elderly individuals.
- Check Compatibility: Ensure the valve is compatible with your plumbing system and water pressure.
- Read Reviews: Research different brands and models and read customer reviews.
- Look for Certifications: Choose valves that are certified by reputable organizations, such as the American Society of Sanitary Engineering (ASSE).
- Understand the Warranty: Check the manufacturer’s warranty for coverage and duration.
Advanced Shower Mixing Valve Diagrams and Technologies
Modern shower systems are increasingly incorporating advanced technologies and features, leading to more complex shower mixing valve diagrams. Digital shower systems, for example, use electronic controls to regulate water temperature and flow, often with programmable settings and remote control capabilities. These systems may include features such as temperature displays, flow rate adjustments, and preset temperature options. Their diagrams can be more intricate, involving electronic sensors, microprocessors, and solenoid valves.
Another advancement is the integration of smart home technology. Smart shower systems can be controlled via smartphone apps or voice commands, offering unparalleled convenience and customization. The shower mixing valve diagram for such systems will include the communication interfaces and control circuitry.
The Future of Shower Mixing Valve Technology
The future of shower mixing valve technology is likely to focus on improved energy efficiency, enhanced user experience, and greater integration with smart home systems. Expect to see more valves with advanced temperature control algorithms, water-saving features, and intuitive interfaces. Shower mixing valve diagrams will continue to evolve to reflect these advancements, providing detailed insights into the inner workings of these sophisticated devices.
Conclusion
A shower mixing valve diagram is an essential tool for understanding, troubleshooting, and maintaining shower mixing valves. By familiarizing yourself with the different types of valves, key components, and troubleshooting techniques, you can ensure your shower system operates safely and efficiently. Whether you are a homeowner, a plumber, or a DIY enthusiast, mastering the art of interpreting a shower mixing valve diagram will empower you to tackle plumbing projects with confidence. Remember to always prioritize safety and consult with a qualified plumber when in doubt. Understanding the shower mixing valve diagram can save time and money on repairs. The shower mixing valve diagram is key to understanding the system. A good shower mixing valve diagram is a valuable asset. Always refer to the shower mixing valve diagram when working on the valve. Use the shower mixing valve diagram for accurate diagnosis. The shower mixing valve diagram helps with proper installation. Consult the shower mixing valve diagram for maintenance. Keep a shower mixing valve diagram handy for future reference. Learning the shower mixing valve diagram is a worthwhile investment. The shower mixing valve diagram is your guide to shower valve repair. A detailed shower mixing valve diagram is invaluable. A clear shower mixing valve diagram simplifies troubleshooting. A shower mixing valve diagram is essential for DIY plumbing. The shower mixing valve diagram shows the valve’s inner workings. The shower mixing valve diagram is a plumber’s best friend.
